Yes, you can fix rounded shoulders, and for most people it does not require special equipment or a gym membership. The fix is a daily dose of chest stretching paired with targeted upper back strengthening, done consistently for 6 to 8 weeks. Start right now: stand in a doorway, place your forearm on the frame at shoulder height, and lean forward gently until you feel a stretch across your chest. Hold for 30 seconds.
TL;DR:
- Consistent daily stretching of the chest and strengthening of upper back muscles over six to eight weeks is essential for correcting rounded shoulders.
- Proper technique during stretches, such as avoiding overextending the lower back and bouncing, significantly improves effectiveness and safety.
- Strengthening exercises like pull-aparts, scapular squeezes, and prone I/T/Y raises target scapular stabilizers to maintain proper shoulder positioning.
- Improving thoracic mobility with foam rollers or rotational work before strengthening helps address underlying spine restrictions.
- Environmental adjustments like monitor height, chair support, and regular movement breaks are vital for sustaining postural correction.
Table of Contents
- Quick Routine: The 5 Moves to Start Today
- How Do You Stretch Rounded Shoulders Correctly?
- Which Strength Exercises Actually Pull the Shoulders Back?
- Why Thoracic Mobility Comes Before Strength
- What Does a 6 to 8 Week Program Look Like?
- When Should You See a Physical Therapist Instead?
- Ergonomic Changes That Keep the Fix From Fading
- What Mistakes Make Rounded Shoulders Worse?
- How Evergreenbliss Supports Safe, Sustainable Posture Work
- A Realistic Note on Progress
- Which Evergreenbliss Products Actually Help With Rounded Shoulders?
- Sources
Quick Routine: The 5 Moves to Start Today
Rounded shoulders happen because the pecs get tight and short while the muscles between your shoulder blades go weak and long. You fix that imbalance by attacking both sides at once. Here are the five moves that do the most work for the least time invested, in the order to perform them.
- Doorway chest stretch. Stand in a doorframe, forearm against the frame at shoulder height, and rotate your body away until you feel the stretch through your chest. Hold 30 seconds per side.
- Wall angels (wall slides). Back flat against a wall, arms in a goalpost shape, slide them overhead while keeping contact with the wall. Ten slow reps.
- Band pull-aparts. Hold a light resistance band at chest height, arms extended, and pull it apart by squeezing your shoulder blades together. Two sets of 15.
- Prone I, T, and Y raises (or scapular squeezes). Lying face down, lift your arms in each letter shape, or simply lie down and pinch your shoulder blades together and hold. Ten reps per position.
- Thoracic extension over a foam roller. Lie over a foam roller placed across your mid back and let your upper spine arch gently over it. One to two minutes of slow breathing.
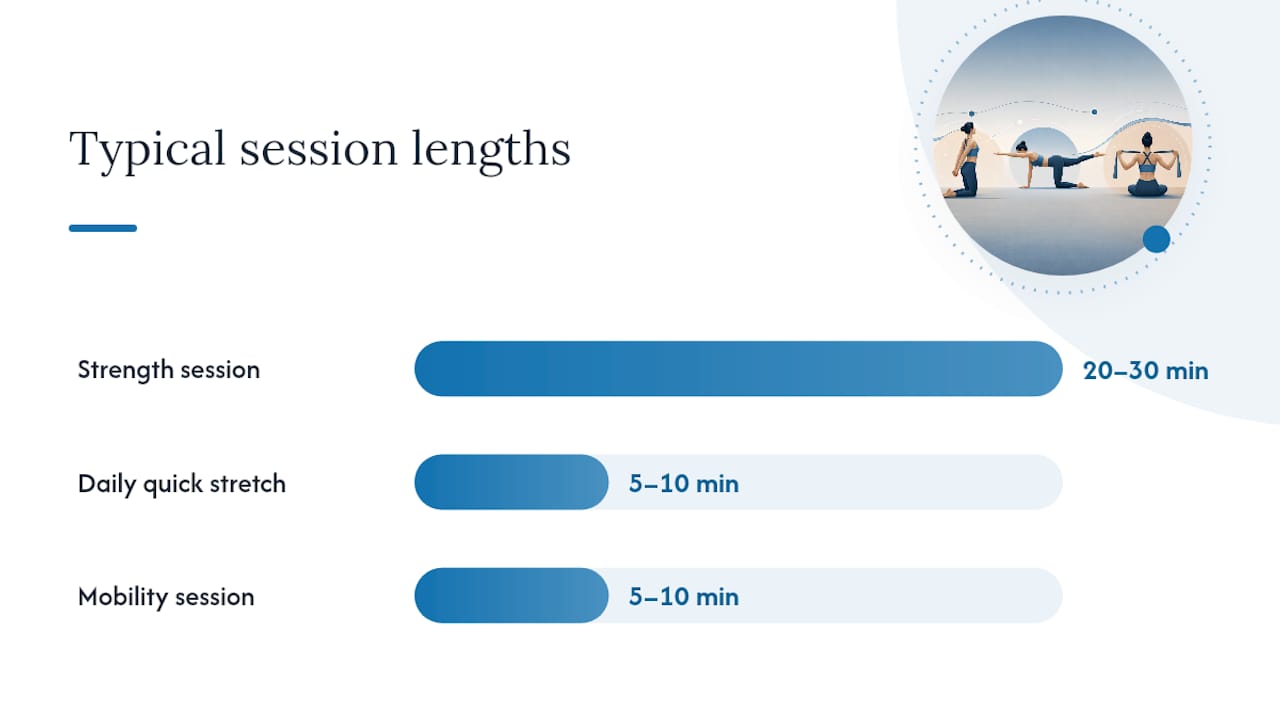
Budget 20 to 30 minutes for a full session, which lines up with evidence-based guidance on rounded shoulder rehab. Stretch daily. Do the strengthening moves 3 to 4 times a week. No resistance band on hand? A towel or an old bicycle inner tube works fine for pull-aparts, and you can do wall angels against any flat wall, including the side of a refrigerator in a pinch.
How Do You Stretch Rounded Shoulders Correctly?
Stretching gets the tight muscles out of the way so your upper back can actually do its job. Skip this step and every strengthening exercise you do fights against pecs that refuse to lengthen.
The doorway stretch, done right. Most people rush this one. Stand in the doorway, place your forearm flat against the frame with your elbow bent to about 90 degrees, then step your opposite foot forward and rotate your torso away from the arm. Raising your arm higher on the frame shifts the stretch toward the upper pec (pec major); lowering it toward waist height targets the deeper pec minor, which is usually the bigger culprit in rounded posture. Hold each angle for around 30 to 60 seconds, repeating a few rounds per side.
Wall stretch and handclasp variation. Stand tall with your back near a wall, clasp your hands behind you, and gently draw your shoulder blades down and together while lifting your clasped hands slightly away from your lower back. This one targets the front of the shoulder and chest simultaneously. Hold 30 seconds, repeat three times.
Neck and upper trap release. Rounded shoulders drag the head forward, and the upper traps and neck muscles tighten in response. Sit tall, gently tilt your ear toward one shoulder without lifting the opposite shoulder, and hold 20 to 30 seconds per side. Keep this one gentle. If you feel tingling, numbness, or sharp pain radiating down an arm, stop immediately.
Common errors sabotage more stretching sessions than people realize:
- Overextending the lower back to compensate for tight hips or shoulders, which turns a chest stretch into a lumbar strain.
- Shrugging the shoulders up toward the ears during any stretch, which cancels out the very muscles you are trying to lengthen.
- Bouncing instead of holding still, which triggers a protective reflex that tightens the muscle instead of releasing it.
- Stretching cold, before any movement has warmed the tissue, which makes the stretch less effective and slightly riskier.
Pro Tip: Exhale slowly as you settle into each stretch. A long exhale relaxes the nervous system’s grip on the muscle, and you’ll typically feel the stretch deepen a few seconds after the breath, not during the initial push.
Which Strength Exercises Actually Pull the Shoulders Back?
Stretching loosens the front. Strengthening pulls the shoulder blades into a better resting position and keeps them there, and this is the half of the equation people skip most often because it takes more focus than a passive stretch.
- Band pull-aparts. Hold a resistance band at chest height with arms extended in front of you, palms down. Pull the band apart by driving your shoulder blades down and back, not by yanking with your arms. Think “shoulders down and back,” not “arms wide.” Two to three sets of 12 to 15 reps, with a two-second pause at full stretch.
- Prone I, T, Y progression. Lie face down on a bed or mat, forehead supported. Lift your arms overhead in a “Y” shape, then out to the sides in a “T,” then down by your hips in an “I,” squeezing your shoulder blades at the top of each. Start with bodyweight only for the first several weeks. Once you can hold each position with good control for full sets, add light dumbbells, starting around 1 to 2 pounds before progressing toward 3 to 5 pounds. The goal is longer time under tension and better endurance in the lower trapezius, not lifting heavy fast.
- Band rows (a practical face-pull alternative). Anchor a band at chest height, step back to create tension, and pull the band toward your ribs while keeping your elbows tucked slightly below shoulder height. Watch for neck compensation. If your head juts forward or your traps do all the work, drop the resistance and slow the tempo.
- Scapular squeezes. Sitting or standing tall, pull your shoulder blades together and down as if pinching a pencil between them, hold for 5 seconds, release slowly. Ten reps, several times a day if you like. This one is less about building muscle and more about teaching your brain where “shoulders back” actually feels like, which matters more than people expect once the strength is already there.
Pro Tip: Do scapular squeezes at red lights, during commercials, or every time you refill your water bottle. Frequency of the cue matters more than the intensity of any single session.
Wall slides and band pull-aparts specifically target the mid and lower trapezius and other scapular stabilizers that most desk-bound people have essentially stopped using. If shoulder blade winging shows up during any of these, it usually means the load is ahead of your control. Drop the resistance and rebuild the pattern first.
Why Thoracic Mobility Comes Before Strength
Your shoulder blades sit on your rib cage, and if your mid back is locked into a flexed, rounded position, no amount of scapular squeezing will pull your shoulders where you want them. A stiff thoracic spine physically blocks the shoulder blades from gliding into a corrected position, so the joint compensates by relying on the neck and lower back instead.
Foam roller thoracic extensions address this directly. Lie on your back with a foam roller placed horizontally under your mid back, knees bent, feet flat. Support your head with your hands and let your upper back arch gently over the roller as you exhale, then curl forward slightly to reposition. Work for one to three minutes, breathing slowly throughout.
No foam roller? Two simple alternatives cover the same ground:
- Half-kneeling thoracic rotations. Kneel with one knee down, opposite hand on the floor for support, and rotate your free arm up toward the ceiling, following it with your eyes. Five to eight slow rotations per side.
- Wall-based thoracic rotations. Stand with your side against a wall, arms crossed at your chest, and rotate your torso to bring your elbow toward the wall behind you, then reverse.
If thoracic motion is genuinely limited, coach it before loading up the strength exercises. Trying to force a full scapular retraction through a stiff spine builds a compensation pattern instead of the pattern you actually want.
What Does a 6 to 8 Week Program Look Like?
Improvement follows a rough timeline that shows up across the research on postural correction. Early gains, better awareness, slightly less tightness, tend to show up in 2 to 4 weeks. Visible change in how your shoulders sit at rest usually takes the full 6 to 8 weeks, and longstanding cases that have been years in the making may take longer than that.
A weekly structure that fits the recommended session length and frequency looks like this:
- Daily: 5 to 10 minutes of chest and neck stretching, any time of day.
- Three strength sessions per week: the full band pull-apart, prone I/T/Y, and row circuit, 20 to 30 minutes each.
- Two short mobility sessions: 5 to 10 minutes of foam roller and rotational work, ideally before a strength session.
Each session should follow a simple template: two minutes of light movement to warm up, a couple minutes of thoracic mobility work, three targeted strength exercises, then finish with the stretches from the quick routine above. Once you hit the 6 to 8 week mark and the change holds, drop to a maintenance frequency of 3 to 4 sessions a week rather than stopping entirely. If a movement still feels tight or weak at week 4, add a set rather than more weight. Progression in this kind of corrective work comes from control and repetition, not from loading up fast.
When Should You See a Physical Therapist Instead?
Self-checks help you track real change. Stand sideways against a mirror or take a photo: if your ear sits noticeably in front of your shoulder, or your shoulders sit visibly in front of your hips, that’s the pattern you’re correcting. Watch for shoulder blades that wing or pop out during pushing movements, and check whether you can raise both arms overhead without arching your lower back.
Some signs mean it’s time to stop self-treating and get evaluated:
- Pain that is severe, sharp, or persists beyond a few days of rest.
- Numbness, tingling, or weakness in your arm or hand.
- Breathing that feels restricted or shallow.
- A visible spinal curve that seems to be worsening over time.
- Recent trauma, a fall, or an accident preceding the symptoms.
A physical therapist will check your range of motion, test specific muscle strength, and screen for neurological signs before building an individualized plan. Physical therapists generally agree that supervised, individualized programs outperform generic routines once progress stalls or pain enters the picture. Self-care is a reasonable starting point. It is not the right call once these flags show up.
Ergonomic Changes That Keep the Fix From Fading
Exercise rebuilds the muscle pattern. Your environment decides whether that pattern survives an 8 hour workday. Skip the ergonomic side and you’re stretching and strengthening against a desk setup actively working against you.
- Monitor height: top of the screen at eye level, so you’re not tipping your head down or craning it forward for hours at a time.
- Chair support: a chair that supports your lower back keeps your pelvis from tilting back, which is often where the whole rounded chain starts.
- Keyboard placement: elbows close to your body at roughly 90 degrees, not reaching forward.
- Movement breaks: stand, stretch, or walk for a minute or two every 30 to 60 minutes. Set a timer if you have to.
- Sleep posture: a pillow that keeps your neck neutral, not tilted up or crushed down, and side sleeping with a pillow between your knees if you tend to curl forward overnight.
Sustainable posture change pairs exercise with these environmental fixes, because a body that reverts to the same slumped position for 40 hours a week will slowly undo weeks of stretching work. Build one small ritual around an existing habit, like the doorway stretch while your coffee brews, and it sticks far better than a routine you have to remember from scratch. For a broader look at all-day posture habits, this guide to maintaining posture throughout the day covers the workstation side in more depth.
What Mistakes Make Rounded Shoulders Worse?
A handful of common habits quietly undo good intentions. Watch for these:
- Heavy chest-dominant training without balancing pulls. Bench pressing three times a week with no rowing or pulling work tightens the exact muscles causing the problem.
- Behind-the-neck presses and upright rows. Both put the shoulder joint in a compromised position and offer little benefit that a safer alternative doesn’t provide.
- Leaning on a posture brace as a long-term fix. A brace can serve as a short-term cue, worn for 15 to 30 minutes to remind your body what upright feels like, but relying on it constantly can leave your stabilizer muscles doing less work over time.
- Shrugging instead of squeezing. If your shoulders creep up toward your ears during rows or pull-aparts, the movement is being driven by the wrong muscles.
- Pushing through pain. Sharp or radiating pain during any exercise means stop, regress the movement, and check with a physical therapist if it persists.
Pro Tip: Film yourself doing one set of band pull-aparts from the side. Shoulder shrugging is nearly invisible to you in the moment but obvious on video.
How Evergreenbliss Supports Safe, Sustainable Posture Work
Exercise and, when needed, a physical therapist remain the core of correcting rounded shoulders. Tools can support that work, not replace it. A posture brace can act as a helpful physical reminder during the first few weeks of retraining a new position, worn in short stretches rather than all day. A foam roller extends the thoracic mobility work covered earlier into a daily habit that takes minutes. Resistance bands scale easily from the lightest pull-apart work up to heavier rows as your upper back gets stronger. None of these products fix rounded shoulders on their own. They make consistent practice easier to sustain, which is usually the actual bottleneck for most people trying to change a years-old habit.
A Realistic Note on Progress
Consistency beats intensity here. A doorway stretch done daily with your morning coffee will outperform an intense session you do once and abandon. Track something concrete, like how far your arms reach overhead during wall slides, instead of chasing a mirror image of perfect posture. Small, measurable wins keep you going when the change feels slow.
— Cadence
Which Evergreenbliss Products Actually Help With Rounded Shoulders?
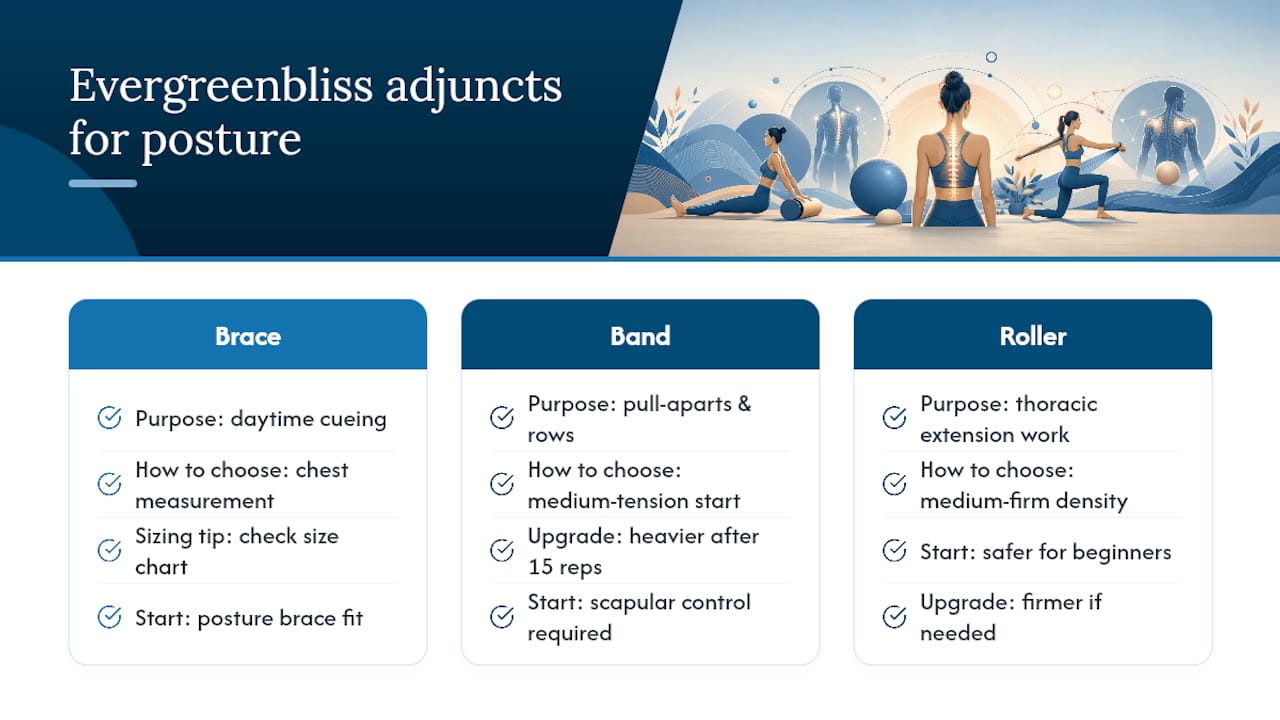
Evergreenbliss is built around the same idea this article just walked through: correction comes from consistent movement, and the right tools make that consistency easier to hold onto. Instead of guessing which brace or roller fits your setup, think of these as three adjuncts to the routine above, not replacements for it.
Sizing on posture braces usually comes down to chest measurement, so check the size chart before buying rather than guessing from your shirt size. A medium-tension resistance band works for most beginners starting band pull-aparts and rows; move to a heavier band once 15 reps feel easy with good scapular control. Foam rollers come in different densities, and a medium-firm roller is the safer starting point for thoracic extension work if you’re new to it. Evergreenbliss’s personal care and hygiene gadgets collection covers braces and massagers for the days your upper back needs more than a stretch, while the home fitness recovery equipment collection has the foam rollers and bands that round out the routine in this guide. If you’re ready to add one adjunct to your current setup, start with whichever gap is holding you back most: a brace for daytime cueing, or a roller for the mobility work your desk job never lets you do.
Sources
The routines and timeline in this guide draw on Medical News Today’s overview of rounded shoulder causes and exercises, Healthline’s breakdown of corrective exercises, a clinical trial on posture-improving exercises published in PMC, Harvard Health’s guidance on posture timelines, and Hinge Health’s physical therapist recommendations. For mobility sequencing beyond the shoulders, htktrainingblog’s guide to mobility and athletic longevity is worth a read.
This article is general information, not a substitute for advice from a qualified doctor. Consult a qualified healthcare professional about your own circumstances before acting on anything here.
- Rounded Shoulders: Causes, risk factors, diagnosis, and exercises
- Is it too late to save your posture?