The best resistance band anchor options fall into four categories: adjustable rail systems, fixed wall hooks, door anchors, and wrap-around or portable methods. Rails win for home multi-height training, fixed hooks suit tight budgets with a planned layout, door anchors handle travel and rentals, and wrap-around methods cover rehab or low-tension work with zero installation.
- Home multi-height training: adjustable rail system
- Fixed budget, single setup: wall-mounted hook kit
- Travel or rented space: door anchor
- Rehab or light-tension work: wrap-around or furniture anchor
Pro Tip: Before you load a single band, confirm what’s behind the wall, pull light for a few reps, and check every contact point for fraying.
Key Takeaways
The safest and most flexible resistance band anchor choice depends on your wall substrate, your program’s height needs, and whether you prioritize permanence or portability.
| Point | Details |
|---|---|
| Match anchor to program | Choose rails for multi-height needs, fixed hooks for one planned layout. |
| Verify substrate first | Confirm studs, concrete, or plywood backing before drilling any wall anchor. |
| Hinge side, fully latched | Door anchors fail most often from wrong-side placement or an unlatched door. |
| Protect contact points | Rubber-coated hooks and broad plates prevent abrasion at peak tension points. |
| Start with ready-made kits | Evergreenbliss offers band kits and recovery gear built for portable, rehab-friendly anchoring without wall installation. |
Table of Contents
- What Are the Main Resistance Band Anchor Options?
- Wall-Mounted Options: Fixed Kits vs. Adjustable Rails
- How Do You Set Up Portable and Temporary Anchors?
- What Should Your Installation Safety Checklist Include?
- Why Contact Surfaces Matter More Than People Think
- How Do You Choose the Right Anchor for Your Setup?
- Why Adjustable Rails Often Win for Home Training Walls
- A Publisher’s Note on This Guide
- Ready-Made Options If You’d Rather Skip the Drilling
- Frequently Asked Questions
- Sources
What Are the Main Resistance Band Anchor Options?
Six categories cover almost every training situation. Wall-mounted fixed hooks bolt into studs or concrete at set heights, ideal once you know your program won’t change much. Adjustable rail systems use a track with sliding anchor points, so one installation gives you high, mid, and low positions without extra hardware.
Door anchors wedge a strap or disc into a door frame using the door itself as leverage. Pull-up bar and power rack attachments clip onto existing gym hardware you already trust for load. Wrap-around anchors loop a band around a post, tree, or squat rack upright. Furniture anchors are the temporary fallback, useful in a pinch but the least reliable long term.
- Wall hooks: cheap, permanent, zero flexibility once installed
- Rails: higher upfront cost, but change anchor height in seconds
- Door anchors: fully portable, limited to one general height range
- Wrap-around: free if you already own a sturdy post, unreliable on weak furniture
A shoulder rehab client doing scapular work at chest height uses a wrap-around post. A home gym owner running full-body programming benefits most from rails. Someone training out of hotel rooms leans on a door anchor every time.
Wall-Mounted Options: Fixed Kits vs. Adjustable Rails
Fixed-hook kits, usually three or six hooks, get bolted at specific heights you choose once and live with. Adjustable rail systems, like a pair of 23-inch rails with sliding anchor positions, let you reposition the anchor point instead of drilling new holes every time your program changes.
Installation tradeoffs run in opposite directions. Fixed hooks demand precise layout planning before you drill, since moving a hook means new holes and patched drywall. Rails cost more but forgive changes in exercise selection. Both need real structural backing. That means studs, concrete anchors, or a mounted plywood backer board, never drywall alone carrying a loaded band stack.
- Fixed kits: lower cost, permanent layout, best for one predictable program
- Rails: higher cost, height changes in seconds, better for shared or evolving use
- Both: require stud, concrete, or plywood backing, not hollow drywall
Pro Tip: If more than one person trains on the same wall, or your program shifts between shoulder, hip, and ankle work, pay the extra cost for rails. If you know exactly what you’re anchoring and where, a fixed kit does the job for less.
How Do You Set Up Portable and Temporary Anchors?
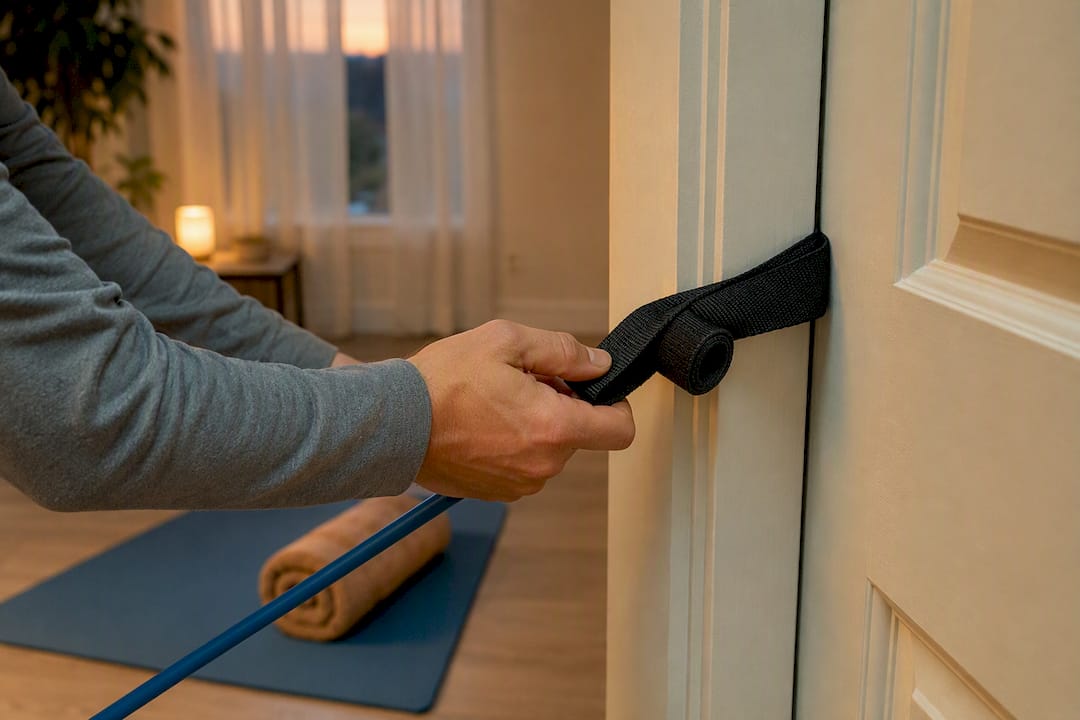
Door anchors and wrap-around methods need no tools, but the setup order matters.
Door anchor setup:
- Slide the anchor disc or strap over the top of the door on the hinge side.
- Close the door completely and confirm the latch has fully engaged.
- Give the band a firm test tug before starting your set.
Wrap-around setup:
- Choose a genuinely sturdy vertical support, a tree trunk or squat rack upright, not a thin branch or a chair leg.
- Loop the band through itself around the post to cinch it tight.
- Test with a light pull through the full range before working reps.
Pull-up bars and power rack attachments work well when you clip into a rated point rather than a decorative crossbar or a gate not built for lateral load.
Most mistakes trace back to a short list:
- Anchoring on the latch side of the door instead of the hinge side
- Starting a set before confirming the door is fully closed and latched
- Using furniture, thin railings, or weak posts as a substitute anchor
- Loading more band tension than the anchor point was ever designed to hold
Hinge-side placement and a fully latched door account for most avoidable door-anchor injuries.
What Should Your Installation Safety Checklist Include?
Run this sequence before your first working set on any mounted anchor:
- Confirm what’s behind the wall. Studs, concrete, or a plywood backer board qualify; drywall alone does not for anything beyond the lightest bands.
- Use the hardware the manufacturer specifies, not generic screws pulled from a junk drawer.
- Torque fasteners to snug, not stripped, and recheck them after the first week of use.
- Position the anchor at the height your actual exercises require, not wherever drilling was easiest.
- Pull light for several reps first, then inspect the hardware while under load before going heavier.
Loop bands and handled tubes can generate anywhere from roughly 5 pounds to over 100 pounds of tension at peak stretch, depending on resistance level. That range is exactly why a listed pull-capacity claim only holds if your wall, fasteners, and installation match it.
Pro Tip: Never trust a drywall-only anchor for a heavy band stack, and retire any band showing cracks, thinning, or nicks the moment you spot them. Avoid suspension or bodyweight-style loading on any anchor unless the hardware is explicitly rated for it.
Why Contact Surfaces Matter More Than People Think
A band dragged over a narrow, rough edge wears out fastest exactly where tension peaks, often at the anchor point itself rather than the handles. Smooth, broad contact surfaces slow that wear dramatically.
- Rubber-coated hooks spread load and reduce direct metal-to-band friction
- Broad anchor plates avoid the sharp bend points that thin hooks create
- Carabiners routed through a protective sleeve keep loop bands from grinding against metal edges
Cracking, thinning, or visible cuts mean it’s time to retire the band, not patch it. A small nick can be taped over for one more session in a pinch, but sleeves and tape are stopgaps, not fixes.
How Do You Choose the Right Anchor for Your Setup?
Match the anchor to your training pattern before you match it to price.
- Desired anchor heights: single fixed point or multiple positions for different lifts
- Verified substrate: stud, concrete, or plywood backer, confirmed before you drill
- Band compatibility: loop bands versus tube-and-handle sets often need different attachment styles
- Pull-capacity caveat: a listed rating only holds if your installation matches it
- Contact surface protection: rubber-coated or broad plates over bare metal edges
- Portability versus permanence: door anchors travel, wall systems don’t
- Budget range: fixed hooks run cheapest, rail systems and multi-point panels cost more upfront
Choose rails if your program touches multiple heights in the same week. Reserve heavy-duty door anchors for stacks actually within their rated capacity, not just because the door is handy. A commercial anchor gives you tested hardware and a stated load rating; a DIY bolt-and-hook setup can work fine, but you’re the one guaranteeing it holds.
Why Adjustable Rails Often Win for Home Training Walls
For a single home wall serving more than one type of workout, an adjustable two-rail system is usually the strongest single purchase you can make. One installation gives you repeatable high, mid, and low anchor points instead of committing to fixed positions you might outgrow within a month.
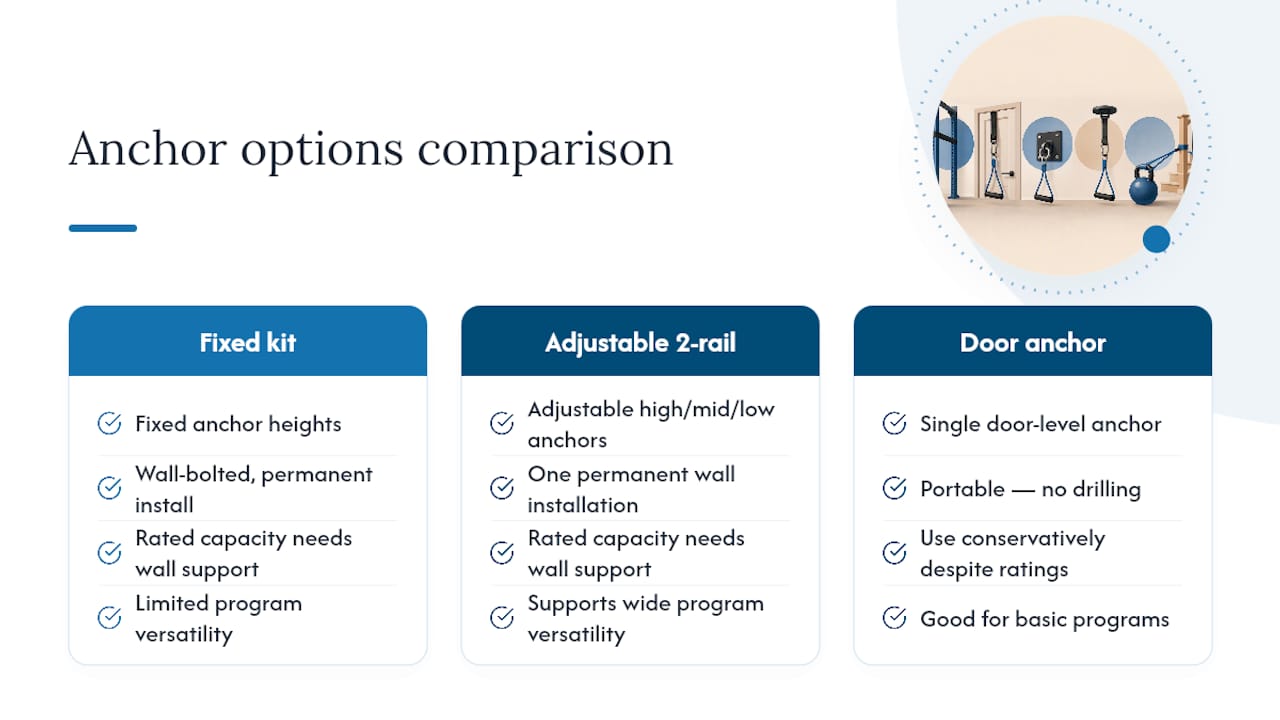
That said, a rated capacity like 300 pounds only means something if the wall behind it, the fasteners used, and your installation quality all support it. Start light, verify the rail holds under real tension, and only then push into heavier band stacks.
Pro Tip: If you can’t confirm what’s actually behind your wall, whether it’s stud, concrete, or something you’re not sure about, skip the drill entirely. A portable door anchor used conservatively beats a rail system bolted into a wall you can’t verify.
A Publisher’s Note on This Guide
Evergreenbliss builds this kind of guidance around the same categories we stock: resistance bands, recovery tools, and rehab-friendly gear. Anchoring is where good band programs succeed or fail, so we treat it with the same care we put into every product page.
Ready-Made Options If You’d Rather Skip the Drilling
If reading through substrate checks and fastener torque makes you want a setup that just works out of the box, Evergreenbliss carries options built for exactly that. Our resistance bands kit for home workouts comes with a full range of tension levels, and pairs naturally with door anchors or wrap-around methods without any wall hardware at all.

For readers leaning toward rehab or lower-tension work, the Pilates loop and stretch kit skips heavy anchor demands entirely, and our home fitness recovery equipment collection rounds out a setup with posture and recovery tools that complement band work. Browse the collection to find a portable setup that matches your space and skip the wall-mounting decision altogether.
Frequently Asked Questions
What is the safest resistance band anchor option for a rental apartment? A door anchor is the most practical choice since it requires no drilling. Place it on the hinge side, confirm the door is fully latched, and test with a light pull before your first set.
Can I anchor a resistance band to drywall alone? Drywall without a stud or plywood backer can’t reliably support anything beyond very light bands. Locate a stud, use a concrete anchor, or mount a plywood backer board instead.
Do adjustable rail systems work better than fixed hooks? Rails cost more but let you change anchor height without new hardware, which suits varied programs. Fixed hooks are cheaper and work well if your layout won’t change.
How do I know when to retire a resistance band? Watch for cracking, thinning, or visible cuts along the band. Once any of those appear, replace the band rather than continuing to train on it.
Are heavy-duty door anchors safe for high-resistance bands? Only on a solid, fully closed door, and only within the manufacturer’s stated rating. Test light first and never assume a rating applies to your specific door and frame.
Sources
Recommended
- Resistance Bands Kit for Effective Home Workouts | Evergreen Bliss
- The Smarter Way to Work Out with Resistance Bands | Evergreen Bliss
- 11-Piece Resistance Bands for Effective Home Workouts | Evergreen Bliss
Sources and further reading
- Resistance bands: 3 great ways to build upper body strength – Harvard Health Publishing
- Strength training: Get stronger, leaner, healthier – Mayo Clinic