Yes, posture-related neck humps respond well to targeted exercise. If your hump developed from years of forward head posture, rounded shoulders, or desk work, a consistent program of dowager’s hump exercises can produce visible improvement in as little as 6–12 weeks. Start today with these three moves:
- Daily chin tucks: 3 sets of 10 reps, holding each rep for 5 seconds. This is the single most clinician-recommended move for forward head posture.
- Doorway chest stretch: Hold 20–30 seconds, 2–3 times daily. Tight pectorals pull your shoulders forward and feed the hump.
- Screen at eye level: Raise your monitor so the top third of the screen sits at eye height. Do this before your next work session.
This guide walks you through the full 8-week program, the evidence behind it, and the red flags that mean you need a clinician instead of a YouTube routine.
Pro Tip: Take a side-profile photo before you start. Posture changes are gradual, and a baseline photo is the most honest way to track real progress over 8 weeks.
Key Takeaways
Consistent strengthening of the posterior chain combined with daily anterior stretching and ergonomic correction is the most effective approach to reducing a posture-related neck hump over 6–12 weeks.
| Point | Details |
|---|---|
| Start with three daily moves | Chin tucks, doorway pec stretch, and thoracic foam rolling form the non-negotiable daily foundation. |
| Strengthening drives lasting change | Band rows, face pulls, and wall angels 2–4× per week retrain the muscles that hold your head over your spine. |
| Ergonomics are not optional | Raising your screen to eye level and taking breaks every 30 minutes prevents the posture work from being undone daily. |
| Expect 6–12 weeks for visible results | Consistent daily effort is required; structural or osteoporotic cases need medical evaluation before starting. |
| Evergreenbliss supports the program | Posture braces, resistance bands, and foam rollers from Evergreenbliss work as adjuncts to reinforce the exercise habits. |
Table of Contents
- What a neck hump actually is — and whether exercises apply to you
- Can exercise actually fix a neck hump? What the evidence says
- The most effective neck hump exercises, step by step
- A sample 8-week program you can follow at home
- Lifestyle and ergonomics that make or break your progress
- When to see a clinician instead of pushing through
- What experts and studies say: a concise evidence summary
- A note from Evergreenbliss
- Products that support your posture program at home
- Sources
What a neck hump actually is — and whether exercises apply to you
“Neck hump” is a casual term that covers at least four distinct conditions. Knowing which one you have determines whether neck hump exercises will help.
Forward head posture (FHP) is the most common cause in younger and middle-aged adults. The head drifts forward of the shoulders, the lower cervical spine flattens, and the upper thoracic spine rounds to compensate. Over time, soft tissue accumulates at the base of the neck, creating a visible bump. This is the type that responds best to exercise.
Dowager’s hump (thoracic kyphosis) is the clinical term for an exaggerated curve in the upper thoracic spine. In older adults, it often involves some degree of vertebral compression from osteoporosis. In younger adults, it is usually postural. The postural version improves with exercise; the osteoporotic version needs medical management first.
Buffalo hump is a fat pad at the back of the neck, sometimes linked to prolonged corticosteroid use, Cushing’s syndrome, or significant weight gain. Exercise and posture work alone won’t eliminate a fat pad. If the bump feels soft and fatty rather than bony or muscular, see a physician.
Structural kyphosis from congenital causes, Scheuermann’s disease, or severe fractures requires specialist evaluation. Exercise can support function but rarely reverses the structural deformity.
Use this quick self-screen to decide your next step:
- Onset was gradual, linked to desk work, phone use, or poor posture habits → likely postural FHP; exercises apply
- You are over 60, female, and the curve appeared or worsened without a clear postural cause → consider osteoporotic kyphosis; see a physician first
- The bump is soft, fatty, and not related to spine position → possible fat pad; medical review recommended
- Sudden onset, severe pain, numbness, or weakness in arms or hands → stop and see a clinician
Pro Tip: Stand sideways against a wall with your heels, buttocks, and upper back touching it. If the back of your head doesn’t reach the wall without straining, forward head posture is likely a factor.
Can exercise actually fix a neck hump? What the evidence says
The short answer: for postural causes, yes, with consistent effort over months. The Cleveland Clinic states directly that many posture-related dowager’s humps can be improved or reversed by strengthening upper-back and neck muscles and improving joint mobility.
The clinical logic is straightforward. Forward head posture develops because the deep cervical flexors and upper-back extensors weaken while the pectorals and anterior neck muscles shorten and tighten. Exercises that reverse both sides of that imbalance, strengthen the posterior chain and lengthen the anterior tissues, restore the mechanical balance that holds the head over the spine.
A 2025 randomized trial in college-age participants found that a strengthening-plus-postural-correction program produced greater improvements in craniovertebral angle (CVA) and pain scores over six weeks than a McKenzie-plus-postural-correction program in that sample, with statistically significant differences (p < 0.0001). That is one study in a young adult population, so the results shouldn’t be overgeneralized, but the direction is consistent with the broader clinical literature: strengthening paired with posture education outperforms passive or mobility-only approaches.
What to expect: Visible posture change typically takes 6–12 weeks of consistent daily mobility work plus 2–4 sessions of strengthening per week. Structural or osteoporotic cases may see little change from exercise alone and need medical care.
Houston Methodist clinicians are direct about one limitation: exercise cannot compensate for 8–10 hours of daily forward head posture. If your screen stays too low and you never take breaks, the exercises will fight a losing battle. Ergonomic change is not optional.
The most effective neck hump exercises, step by step
Hospital for Special Surgery experts frame the whole program around two principles: strengthen the posterior chain and lengthen tight anterior tissues. Every exercise below serves one or both.
Mobility and daily micro-work
Chin tucks (cervical retraction) Stand or sit tall. Gently draw your chin straight back, as if making a double chin. Hold 5 seconds. Release slowly. Do 3 sets of 10 daily. This trains the deep cervical flexors and directly counteracts forward head drift. Keep your eyes level throughout; don’t tilt your chin down.

Thoracic foam rolling Place a foam roller perpendicular to your spine at mid-back. Support your head with your hands. Gently extend over the roller for 20–30 seconds, then shift it one segment up or down. Spend 2–3 minutes total. This restores thoracic extension mobility, which is often the first thing lost in desk workers.
Cervical extension stretch Sit tall, tuck your chin slightly, then gently tilt your head back to look at the ceiling. Hold 5–10 seconds. Return slowly. Never force range of motion; stop if you feel dizziness or sharp pain.
Stretches to lengthen tight anterior tissues
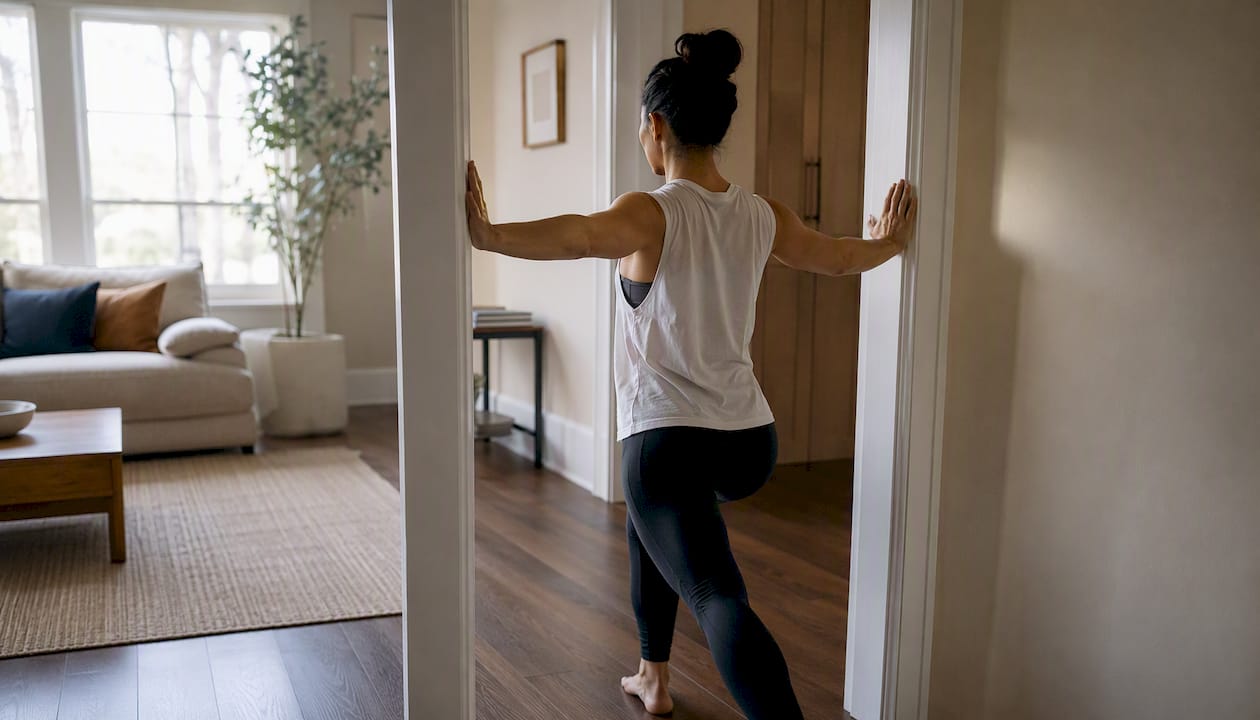
Doorway pectoral stretch Stand in a doorway with both arms at 90 degrees, forearms on the frame. Step one foot forward until you feel a stretch across your chest. Hold 20–30 seconds. Do this 2–3 times daily. Tight pectorals are one of the primary drivers of rounded shoulders.
Sternocleidomastoid (SCM) stretch Sit tall. Tilt your head to the right, then rotate your chin slightly upward and to the left. You should feel a stretch along the left side of your neck. Hold 20–30 seconds per side, twice daily.
Chest opener (arms-behind-back) Clasp your hands behind your lower back. Squeeze your shoulder blades together, lift your chest, and gently extend your thoracic spine. Hold 10–15 seconds. Repeat 5 times.
Strengthening to retrain the posterior chain
These are the moves that create lasting change. Stretching alone won’t hold the correction; the muscles need to be strong enough to maintain it.
Scapular squeezes Sit or stand tall. Squeeze your shoulder blades together and down, as if trying to hold a pencil between them. Hold 5 seconds. Do 3 sets of 15. No equipment needed.

Wall angels Stand with your back flat against a wall, feet 6 inches from the baseboard. Press your lower back, upper back, and head against the wall. Raise your arms to a “goalpost” position (elbows at 90 degrees). Slowly slide your arms up the wall and back down. Do 3 sets of 10. If your head can’t touch the wall, place a small pillow behind it.
Band rows / face pulls Anchor a resistance band at chest height. Hold the ends with both hands, arms extended. Pull the band toward your face, flaring your elbows out and squeezing your shoulder blades at the end of the movement. Do 3 sets of 12–15, 2–4 times per week. Start with light resistance; form matters more than load here.
Dumbbell row Hinge at the hips, flat back, one hand on a bench. Pull a light dumbbell toward your hip, leading with your elbow. Do 3 sets of 10–12 per side. This builds the rhomboids and mid-trapezius that hold your shoulders back.
Safety notes
- Never yank your head back or force cervical range of motion
- If an exercise causes radiating pain, tingling, or numbness in your arms, stop immediately
- Avoid shrugging your shoulders toward your ears during rows; that recruits the upper traps instead of the mid-back
- Progress resistance gradually; soreness is normal, sharp pain is not
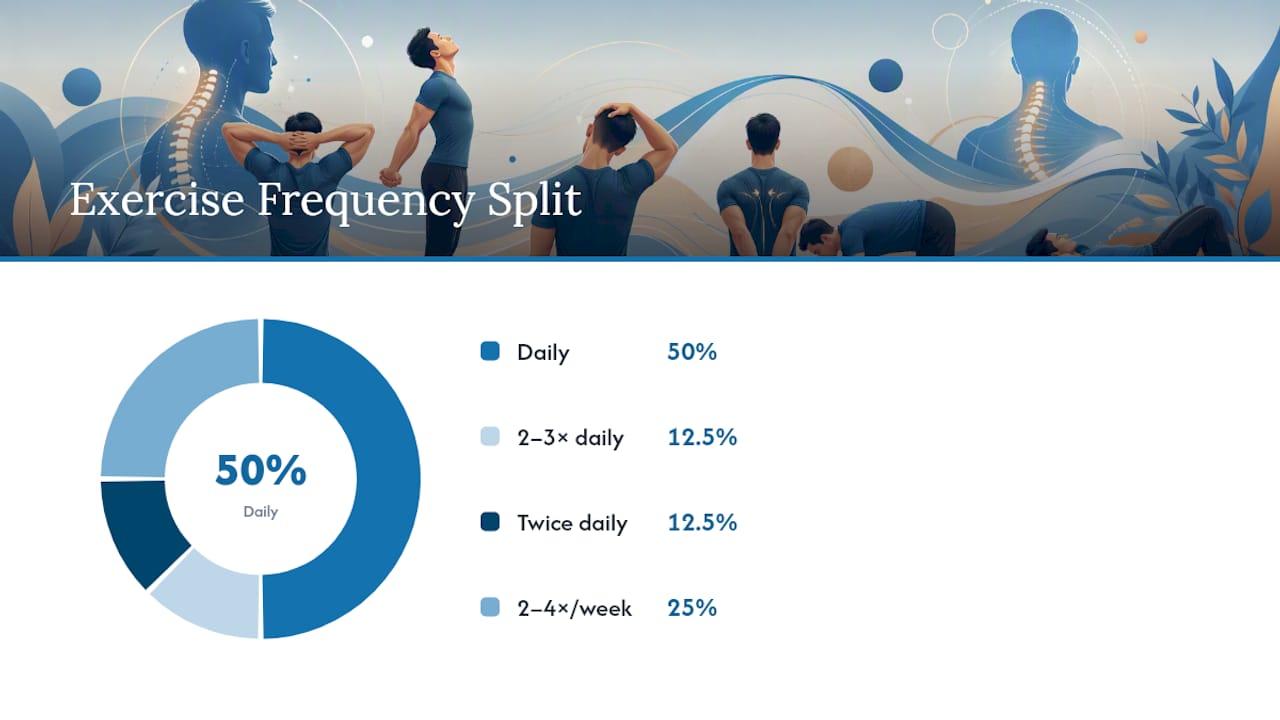
The table below summarizes the full exercise menu with frequency targets:
| Exercise | Type | Sets × Reps | Frequency |
|---|---|---|---|
| Chin tucks | Mobility / strength | 3 × 10 (5s hold) | Daily |
| Thoracic foam rolling | Mobility | 2–3 minutes | Daily |
| Doorway pec stretch | Stretch | 3 × 20–30s | 2–3× daily |
| SCM stretch | Stretch | 2 × 20–30s per side | Twice daily |
| Scapular squeezes | Strength | 3 × 15 | Daily |
| Wall angels | Strength / mobility | 3 × 10 | Daily |
| Band rows / face pulls | Strength | 3 × 12–15 | 2–4× per week |
| Dumbbell rows | Strength | 3 × 10–12 per side | 2–4× per week |
A sample 8-week program you can follow at home
Progress happens in phases. The first two weeks build the habit and restore basic mobility. The middle weeks add load. The final weeks consolidate strength and let you measure real change.
Phase 1 — Weeks 1–2: Mobility and micro-habits
- Every morning: chin tucks (3 × 10) + thoracic foam rolling (2 minutes) + doorway pec stretch (3 × 20s)
- Every evening: SCM stretch (2 × 20s per side) + chest opener (5 × 10s)
- Twice per week: scapular squeezes (3 × 15) + wall angels (3 × 10) with bodyweight only
- Ergonomic audit: raise your monitor, set a break timer for every 30 minutes
Milestone: By the end of Week 2, chin tucks should feel natural and your thoracic extension range should be noticeably freer.
Phase 2 — Weeks 3–5: Add resistance
- Keep all daily mobility and stretching from Phase 1
- Add band rows or face pulls 2–3 times per week (3 × 12, light band)
- Add dumbbell rows 2× per week (3 × 10, light weight, focus on form)
- Progress scapular squeezes to 3 × 20 with a 3-second hold
Milestone: By Week 5, you should be able to complete wall angels with your head touching the wall (or close to it) and feel the mid-back engagement during rows.
Phase 3 — Weeks 6–8: Load and evaluate
- Increase band tension or dumbbell weight by one step
- Progress face pulls to 4 × 15; add a 2-second pause at the end position
- Add thoracic extension over a foam roller with a light plate or book held at your chest (1–2 lbs only)
- Take a new side-profile photo and compare to your Week 1 baseline
- If progress has stalled, consider a single session with a physical therapist for form feedback
| Phase | Weeks | Daily Habits | Strengthening | Key Milestone |
|---|---|---|---|---|
| Mobility foundation | 1–2 | Chin tucks, foam rolling, pec stretch | 2× week, bodyweight | Thoracic extension feels freer |
| Add resistance | 3–5 | All Phase 1 habits | 2–3× week, light band + dumbbell | Wall angels with head on wall |
| Load and evaluate | 6–8 | All prior habits | 3–4× week, increased load | Visible posture shift in photo |
Lifestyle and ergonomics that make or break your progress
Houston Methodist’s clinicians put it plainly: exercise cannot fully compensate for hours of daily forward head posture. The ergonomic changes below are not optional add-ons; they are the other half of the program.
Daily ergonomics checklist:
- Monitor top at eye level (raise it with a stand or stack of books if needed)
- Chair height so your feet are flat and your knees are at 90 degrees
- Keyboard and mouse close enough that your elbows stay near your sides
- Phone held at eye level, not in your lap
- Break every 20–30 minutes: stand, do 5 chin tucks, roll your shoulders back
Sleep position: Back sleeping with a cervical pillow that supports the natural curve of your neck is ideal. Stomach sleeping with your head rotated to one side loads the cervical spine for hours. If you’re a side sleeper, use a pillow thick enough to keep your head level with your spine.
Weight: Excess body weight, particularly around the upper back and neck, increases the mechanical load on the cervical spine and can contribute to both fat-pad accumulation and postural strain. Maintaining a healthy weight supports the structural changes the exercises are trying to create.
Micro-habit cues: Tie posture checks to existing habits. Every time you pick up your phone, do one chin tuck. Every time you sit down at your desk, squeeze your shoulder blades for 5 seconds. These cues add up to dozens of corrective repetitions throughout the day without adding a single minute to your schedule.
For a deeper look at building these habits into your daily routine, the posture improvement guide at Evergreenbliss covers the ergonomic setup in more detail.
Pro Tip: Set a recurring phone alarm labeled “chin tuck + shoulders back” every 30 minutes during your workday. It sounds trivial, but consistent postural cues during the hours you spend at a desk do more cumulative work than a single 20-minute exercise session.
When to see a clinician instead of pushing through
Most posture-related humps are safe to address with a home program. But some presentations need a physician or physical therapist before you start, not after.
Red flags — see a clinician promptly:
- Sudden onset of the hump with no clear postural history
- Severe, progressive, or unrelenting pain in the neck or upper back
- Numbness, tingling, or weakness in your arms or hands (possible nerve compression)
- Pain that wakes you from sleep
- You are over 60 with a new or worsening curve (osteoporotic fracture possible)
- Any history of cancer, infection, or prolonged corticosteroid use
- The bump is soft and fatty rather than related to spine position
Referral pathway: Start with your primary care physician, who can rule out structural causes and order imaging (X-ray or MRI) if indicated. From there, a physical therapist is the most direct route to a supervised, individualized exercise program. If imaging shows significant structural kyphosis, a spine specialist (orthopedic surgeon or neurologist) may be appropriate.
Citrus Spine’s clinical guidance reinforces this: if exercises cause pain or neurological symptoms, stop and seek professional assessment rather than pushing through.
On injections and surgery: These are rarely indicated for simple postural humps. Surgery is reserved for severe structural kyphosis causing neurological compromise or intractable pain. For the vast majority of people reading this, the program above is the appropriate starting point.
What experts and studies say: a concise evidence summary
Three major clinical sources converge on the same framework for posture-related neck humps.
The Cleveland Clinic states that many posture-related dowager’s humps can be improved or reversed with targeted strengthening and mobility work, naming chin tucks, scapular squeezes, and doorway pectoral stretches as practical starting points. Hospital for Special Surgery experts describe the same dual strategy: strengthen the posterior chain, lengthen the anterior tissues. Houston Methodist adds the behavioral layer: ergonomic change must accompany exercise or progress stalls.
The 2025 randomized trial is the most specific piece of trial evidence available. In college-age participants, the strengthening-plus-postural-correction group improved craniovertebral angle and pain scores significantly more than the McKenzie-plus-postural-correction group over several weeks, showing statistically significant differences in that study sample. The study population was young adults, so the magnitude of effect may differ in older or more sedentary groups, but the direction supports prioritizing strengthening alongside posture education.
Shape’s expert-reviewed exercise list cross-confirms the same core moves: chin tucks, thoracic extension, wall angels, and scapular retractions appear across every credible source.
| Source | Key finding | Practical takeaway |
|---|---|---|
| Cleveland Clinic | Posture-related humps often improve with strengthening + mobility | Start with chin tucks, scapular squeezes, pec stretches |
| Hospital for Special Surgery | Dual strategy: strengthen posterior, lengthen anterior | Combine rows/face pulls with chest and neck stretches |
| Houston Methodist | Ergonomics must accompany exercise | Fix screen height and break habits alongside training |
| 2025 RCT (IJSREM) | Strengthening + posture correction outperformed McKenzie + posture correction in CVA and pain at 6 weeks | Prioritize resistance-based posterior chain work |
A note from Evergreenbliss
At Evergreenbliss, the recommendation is always exercise first. The clinical evidence is clear: no product replaces the work of strengthening your upper back and stretching your chest. That said, the right tools can make the program easier to stick with. A posture brace worn for short periods during the day acts as a tactile cue, reminding you to retract your shoulders when your attention drifts. Resistance bands make face pulls and rows accessible at home without a gym. A foam roller is the most cost-effective piece of thoracic mobility equipment available. These are adjuncts to the program, not substitutes for it. Used correctly, they reduce friction and support consistency, which is ultimately what determines whether the 8 weeks actually work.
Products that support your posture program at home
The exercise program above requires minimal equipment, but a few well-chosen tools make a real difference in adherence and comfort.

Posture support brace: Evergreenbliss’s adjustable posture support brace is designed for short-window use, 20–30 minutes during focused work or exercise, to reinforce scapular retraction while your muscles are still learning the position. Wearing it all day defeats the purpose; it should cue, not compensate.
Resistance bands: Light-to-medium resistance bands are all you need for face pulls and rows in Phase 1 and 2. Start with the lightest option and only progress tension when you can complete all sets with clean form. Evergreenbliss’s home fitness recovery equipment collection includes bands suited to this kind of progressive loading.
Foam roller: Thoracic foam rolling is a daily habit in this program. A standard 36-inch high-density roller works for most people. If you want a tool that also supports lumbar and thoracic extension, the lower back stretcher from Evergreenbliss can complement your spinal mobility work.
Neck posture brace: For additional cervical support during recovery periods, the neck posture brace offers targeted support. Use it as a short-term adjunct, not a long-term crutch.
All products are adjunctive tools. The exercises in this guide are the treatment. Browse the full pain relief and posture correction collection to find what fits your program.
These products support the exercise program described in this article. They are not medical devices and are not intended to diagnose, treat, or cure any medical condition. Consult a physician or physical therapist if you have structural kyphosis, osteoporosis, or neurological symptoms.
Sources
- Dowager’s Hump: What It Is and How To Get Rid of It
- Best Exercises to Improve Dowager’s Hump, According to Experts
- How to Get Rid of a Neck Hump
- Randomized trial comparing strengthening + postural correction vs McKenzie + postural correction
- Dowager’s hump exercises (Shape)
This article is general information, not a substitute for advice from a qualified doctor. Consult a qualified healthcare professional about your own circumstances before acting on anything here.